Linux Kernel Namespaces & Control Groups
- Containers use Linux namespaces to provide isolation of system resources from other containers or the host.
- The PID namespace provides isolation for process IDs. If you run top while inside the container, you will notice that it shows the processes within the PID namespace of the container, which is much different than what you can see if you ran top on the host.
- Containers use kernel-level features to achieve isolation and they run on top of the kernel.
- Containers are just a group of processes running in isolation on the same host.
- Linux namespaces include:
- PID: Processes Isolation
- MNT: Mount and unmount directories without affecting other namespaces.
- NET: Containers have their own network stack.
- IPC: Isolated interprocess communication mechanisms such as message queues.
- User: Isolated view of users on the system.
- UTC: Set hostname and domain name per container.
- These namespaces provide the isolation for containers that allow them to run together securely and without conflict with other containers running on the same system.
- Containers are self-contained and isolated, which means you can avoid potential conflicts between containers with different system or runtime dependencies. Isolation benefits are possible because of Linux namespaces.
- For example, you can deploy an app that uses Java 7 and another app that uses Java 8 on the same host.
- Or you can run multiple NGINX containers that all have port 80 as their default listening ports. (If you’re exposing on the host by using the –publish flag, the ports selected for the host must be unique.)
Containers on Windows and Mac:
- Namespaces are a feature of the Linux kernel, so to run the Docker Containers on Windows and Mac, Docker runtime has a Linux subsystem included which is now open-sourced as LinuxKit project. Being able to run containers on many different platforms is one advantage of using the Docker tooling with containers.
- In addition to running Linux containers on Windows by using a Linux subsystem, native Windows containers are now possible because of the creation of container primitives on the Windows operating system.
-
Native Windows containers can be run on Windows 10 or Windows Server 2016 or later.
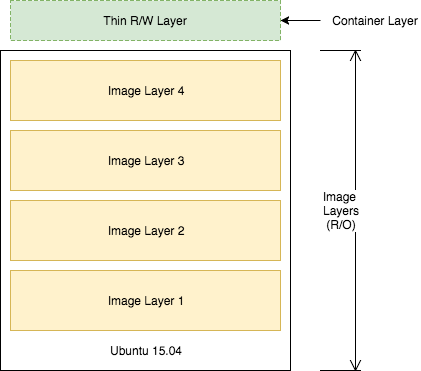
- The container does not have its own kernel. It uses the kernel of the host and the Ubuntu image is used only to provide the file system and tools available on an Ubuntu system.
Docker Layer Caching:
- Layers that change frequently, such as copying source code into the image, should be placed near the bottom of the file to take full advantage of the Docker layer cache.
- This allows you to avoid rebuilding layers that could otherwise be cached.
- For instance, if there was a change in the
FROMinstruction, it will invalidate the cache for all subsequent layers of the image. - There is a caching mechanism in place for pushing layers too. Docker Hub already has all but one of the layers from an earlier push, so it only pushes the one layer that has changed.
- When you change a layer, every layer built on top of that will have to be rebuilt.
- Each line in a Dockerfile builds a new layer that is built on the layer created from the lines before it. This is why the order of the lines in your Dockerfile is important.
- You can optimized your Dockerfile so that the layer that is most likely to change is the last line of the Dockerfile. Generally for an application, your code changes at the most frequent rate.
- This optimization is particularly important for CI/CD processes where you want your automation to run as fast as possible.
Dockerfile
- The Dockerfile is used to create reproducible builds for your application.
- A common workflow is to have your CI/CD automation run
docker image buildas part of its build process. - After images are built, they will be sent to a central registry where they can be accessed by all environments (such as a test environment) that need to run instances of that application.
Dockerfile Commands:
-
FROM:
- Every Dockerfile typically starts with a
FROMline that is the starting image to build container layers on top of. - Selecting a smaller base image means it will download (deploy) much faster, and it is also more secure because it has a smaller attack surface.
- Used to fetch image from registry.
- Only one
FROMcommand is allowed in a Docker file. - You can pull common lines of multiple Dockerfiles into a base Dockerfile, which you can then point to with each of your child Dockerfiles by using the
FROMcommand. -
FROMmust be the 1st line is Docker file. - Example:
FROM python:3.6.1-alpine-
3.6.1-alpineis a tag for the Python image. - It is a best practice to use a specific tag when inheriting a parent image so that changes to the parent dependency are controlled.
- If no tag is specified, the latest tag takes effect, which acts as a dynamic pointer that points to the latest version of an image.
-
- Every Dockerfile typically starts with a
-
COPY:
- Copy files from Host machine to the container.
- This line copies the files kept in the local directory (where you will run docker image build) into a new layer of the image.
- This instruction is the last line in the Dockerfile.
- Layers that change frequently, such as copying source code into the image, should be placed near the bottom of the file to take full advantage of the Docker layer cache.
-
WORKDIR:
- Define the working directory within the container
-
RUN:
- Execute command within the container.
- The
RUNcommand executes commands needed to set up your image for your application, such as installing packages, editing files, or changing file permissions. - The
RUNcommands are executed at build time and are added to the layers of your image.
-
ENV:
- To set environmental variables.
-
CMD:
- Command to execute when run command is provided on the image to start the container.
-
CMDis the command that is executed when you start a container. - There can be only one `CMD` per Dockerfile. If you specify more than one CMD, then the last CMD will take effect.
-
LABEL:
- To provide metadata to the image.
-
EXPOSE:
- To expose container port.
- Further Reading:
Union File System & Copy-on-Write
- Each of the lines in a Dockerfile is a layer.
- Each layer contains only the delta, or changes from the layers before it. To put these layers together into a single running container, Docker uses the Union File System to overlay layers transparently into a single view.
- Each layer of the image is read-only except for the top layer, which is created for the container.
- The read/write container layer implements copy-on-write, which means that files that are stored in lower image layers are pulled up to the read/write container layer only when edits are being made to those files. Those changes are then stored in the container layer.
-
The copy-on-write function is very fast and in almost all cases, does not have a noticeable effect on performance. You can inspect which files have been pulled up to the container level with the docker diff command.
- Because image layers are read-only, they can be shared by images and by running containers.
- For example, creating a new Python application with its own Dockerfile with similar base layers will share all the layers that it had in common with the first Python application.
  FROM python:3.6.1-alpine
  RUN pip install flask
  CMD ["python","app2.py"]
  COPY app2.py /app2.py
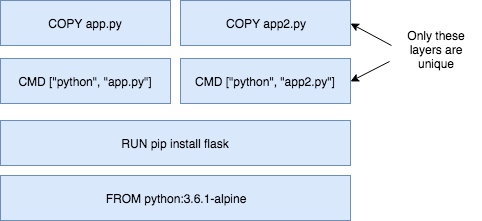
- Because the containers use the same read-only layers, you can imagine that starting containers is very fast and has a very low footprint on the host.
- Image layering enables the docker caching mechanism for builds and pushes.
Docker Swarm:
- Docker Swarm is the orchestration tool that is built in to the Docker Engine.
- When a node in the swarm goes down, it might take down running containers with it. The swarm will recognize this loss of containers and will attempt to reschedule containers on available nodes to achieve the desired state for that service.
Initialize the swarm on node 1:
docker swarm init --advertise-addr eth0
- The
--advertise-addroption specifies the address which the other nodes will use to join the swarm. - This docker swarm init command generates a join token. The token makes sure that no malicious nodes join the swarm. You need to use this token to join the other nodes to the swarm.
Create a three-node swarm
- on both node2 and node3, copy and run the
docker swarm joincommand that was outputted to your console by the last command. - Back on node1, run docker node ls to verify your three-node cluster:
$ docker node ls ID HOSTNAME STATUS AVAILABILITY MANAGER STATUS 7x9s8baa79l29zdsx95i1tfjp node3 Ready Active x223z25t7y7o4np3uq45d49br node2 Ready Active zdqbsoxa6x1bubg3jyjdmrnrn * node1 Ready Active Leader- This command outputs the three nodes in your swarm. The asterisk (*) next to the ID of the node represents the node that handled that specific command (docker node ls in this case).
- Your node consists of one manager node and two workers nodes. Managers handle commands and manage the state of the swarm. Workers cannot handle commands and are simply used to run containers at scale. By default, managers are also used to run containers.
- Although you control the swarm directly from the node in which its running, you can control a Docker swarm remotely by connecting to the Docker Engine of the manager by using the remote API or by activating a remote host from your local Docker installation (using the
$DOCKER_HOSTand$DOCKER_CERT_PATHenvironment variables). This will become useful when you want to remotely control production applications, instead of using SSH to directly control production servers.
Deploy first service on Swarm
- To run containers on a Docker Swarm, you need to create a service.
- A service is an abstraction that represents multiple containers of the same image deployed across a distributed cluster.
- Example: Deploy a NGINX service:
$ docker service create --detach=true --name nginx1 --publish 80:80 --mount source=/etc/hostname,target=/usr/share/nginx/html/index.html,type=bind,ro nginx:1.12 pgqdxr41dpy8qwkn6qm7vke0q- This command statement is declarative language, and Docker Swarm will try to maintain the state declared in this command unless explicitly changed by another docker service command. This behavior is useful when nodes go down, for example, and containers are automatically rescheduled on other nodes.
- The
--mountflag is useful to have NGINX print out the hostname of the node it's running on, useful when you start load balancing between multiple containers of NGINX that are distributed across different nodes in the cluster and you want to see which node in the swarm is serving the request. - The
--publishcommand uses the swarm's built-in routing mesh. In this case, port 80 is exposed on every node in the swarm. The routing mesh will route a request coming in on port 80 to one of the nodes running the container.
Inspect the service
- Use the command
docker service lsto inspect the service you just created:$ docker service ls ID NAME MODE REPLICAS IMAGE PORTS pgqdxr41dpy8 nginx1 replicated 1/1 nginx:1.12 *:80->80/tcp
Check the running container of the service
- To take a deeper look at the running tasks, use the command
docker service ps. - A task is another abstraction in Docker Swarm that represents the running instances of a service.
- In this case, there is a 1-1 mapping between a task and a container.
$ docker service ps nginx1 ID NAME IMAGE NODE DESIRED STATE CURRENT STATE ERROR PORTS iu3ksewv7qf9 nginx1.1 nginx:1.12 node1 Running Running 8 minutes ago - If you know which node your container is running on (you can see which node based on the output from
docker service ps), you can use the commanddocker container lsto see the container running on that specific node.
Test the service
- Because of the routing mesh, you can send a request to any node of the swarm on port 80. This request will be automatically routed to the one node that is running the NGINX container.
- Try this command on each node:
$ curl localhost:80 node1 - Curling will output the hostname where the container is running. For this example, it is running on node1, but yours might be different.
Scale the service with service update
- Use the
docker servicecommand to update the NGINX service to include 5 replicas. This is defining a new state for the service.$ docker service update --replicas=5 --detach=true nginx1 nginx1 - When this command is run, the following events occur:
- The state of the service is updated to 5 replicas, which is stored in the swarm’s internal storage.
- Docker Swarm recognizes that the number of replicas that is scheduled now does not match the declared state of 5.
- Docker Swarm schedules 5 more tasks (containers) in an attempt to meet the declared state for the service.
- This swarm is actively checking to see if the desired state is equal to actual state and will attempt to reconcile if needed.
- After a few seconds, you should see that the swarm did its job and successfully started 9 more containers. Notice that the containers are scheduled across all three nodes of the cluster. The default placement strategy that is used to decide where new containers are to be run is the emptiest node, but that can be changed based on your needs.
$ docker service ps nginx1
Test the service scaling
- The
--publish 80:80parameter is still in effect for this service; that was not changed when you ran the docker service update command. However, now when you send requests on port 80, the routing mesh has multiple containers in which to route requests to. The routing mesh acts as a load balancer for these containers, alternating where it routes requests to. - Try it out by curling multiple times. Note that it doesn’t matter which node you send the requests. There is no connection between the node that receives the request and the node that that request is routed to.
- You should see which node is serving each request because of the useful
--mountcommand you used earlier.$ curl localhost:80 node3 $ curl localhost:80 node3 $ curl localhost:80 node2 $ curl localhost:80 node1 $ curl localhost:80 node1
Limits of the routing mesh
-
 The routing mesh can publish only one service on port 80.
 - If you want multiple services exposed on port 80, you can use an external application load balancer outside of the swarm to accomplish this.
Check the aggregated logs for the service
- Another easy way to see which nodes those requests were routed to is to check the aggregated logs.
- You can get aggregated logs for the service by using the command
docker service logs [service name]. - This aggregates the output from every running container, that is, the output from
docker container logs [container name].$ docker service logs nginx1
- Based on these logs, you can see that each request was served by a different container.
- In addition to seeing whether the request was sent to node1, node2, or node3, you can also see which container on each node that it was sent to. For example, nginx1.5 means that request was sent to a container with that same name as indicated in the output of the command
docker service ps nginx1.
Apply rolling updates to Swarm
- Run the
docker service updatecommand to trigger a rolling update of the swarm.$ docker service update --image nginx:1.13 --detach=true nginx1 - fine-tune the rolling update by using these options:
-
--update-parallelism:- Specifies the number of containers to update immediately (defaults to 1).
-
--update-delay:- Specifies the delay between finishing updating a set of containers before moving on to the next set.
-
- After a few seconds, run the command
docker service ps nginx1to see all the images that have been updated tonginx:1.13.$ docker service ps nginx1
Remove the node from the swarm cluster
- A typical way to leave the swarm:
$ docker swarm leave
Number of nodes in a Docker Swarm
- Manager nodes implement the raft consensus algorithm, which requires that more than 50% of the nodes agree on the state that is being stored for the cluster.
-
If you don’t achieve more than 50% agreement, the swarm will cease to operate correctly. For this reason, note the following guidance for node failure tolerance:
- Three manager nodes tolerate one node failure.
- Five manager nodes tolerate two node failures.
- Seven manager nodes tolerate three node failures.
- You should have at least three manager nodes but typically no more than seven. However, the more manager nodes you have, the harder it is to achieve a consensus on the state of a cluster.
- Worker nodes can scale up into the thousands of nodes. Worker nodes communicate by using the gossip protocol, which is optimized to be perform well under a lot of traffic and a large number of nodes.
Docker Hub:
- The Docker Hub is the public central registry for Docker images. Anyone can share images here publicly. The Docker Hub contains community and official images.
- Hub images include content that has been verified and scanned for security vulnerabilities by Docker.
- Certified Official images that are deemed enterprise-ready and are tested with Docker Enterprise Edition.
- It is important to avoid using unverified content from the Docker Hub when you develop your own images that are intended to be deployed into the production environment. These unverified images might contain security vulnerabilities or possibly even malicious software.